Where it started
I wrote the first version in 2024. It was a small REST API in Go. You sent it a request with the API key, and it restarted one of the systemd units it was allowed to touch.
curl -X POST http://127.0.0.1:4035/api/v1.0/service \
  -H "X-API-Key: $API_KEY" \
  -H "Content-Type: application/json" \
  -d '{"service": "dnl-hns", "method": "restart"}'
The list of services and the actions allowed for each of them lived in a single config.json. The sudo whitelist was built from the same list, so nothing outside of it could be run through the API, and a simple rate limiter sat in front.
For one server and one person that was enough. But the more I used it, the more it got in the way. There was only one key, so whoever had it could do everything the config allowed, and I had no way to let another person restart just one server. Every machine ran its own copy with its own key, so there was no single place to manage them all. And nothing was written down, so when a service restarted in the middle of the night, there was no telling who had done it.
What gorst does now
Today gorst is a system of two parts:
- a worker runs on every server and manages its systemd units;
- a control node (
gorst-controlnode) is the one place with users, policies and the audit log, and where commands come from.
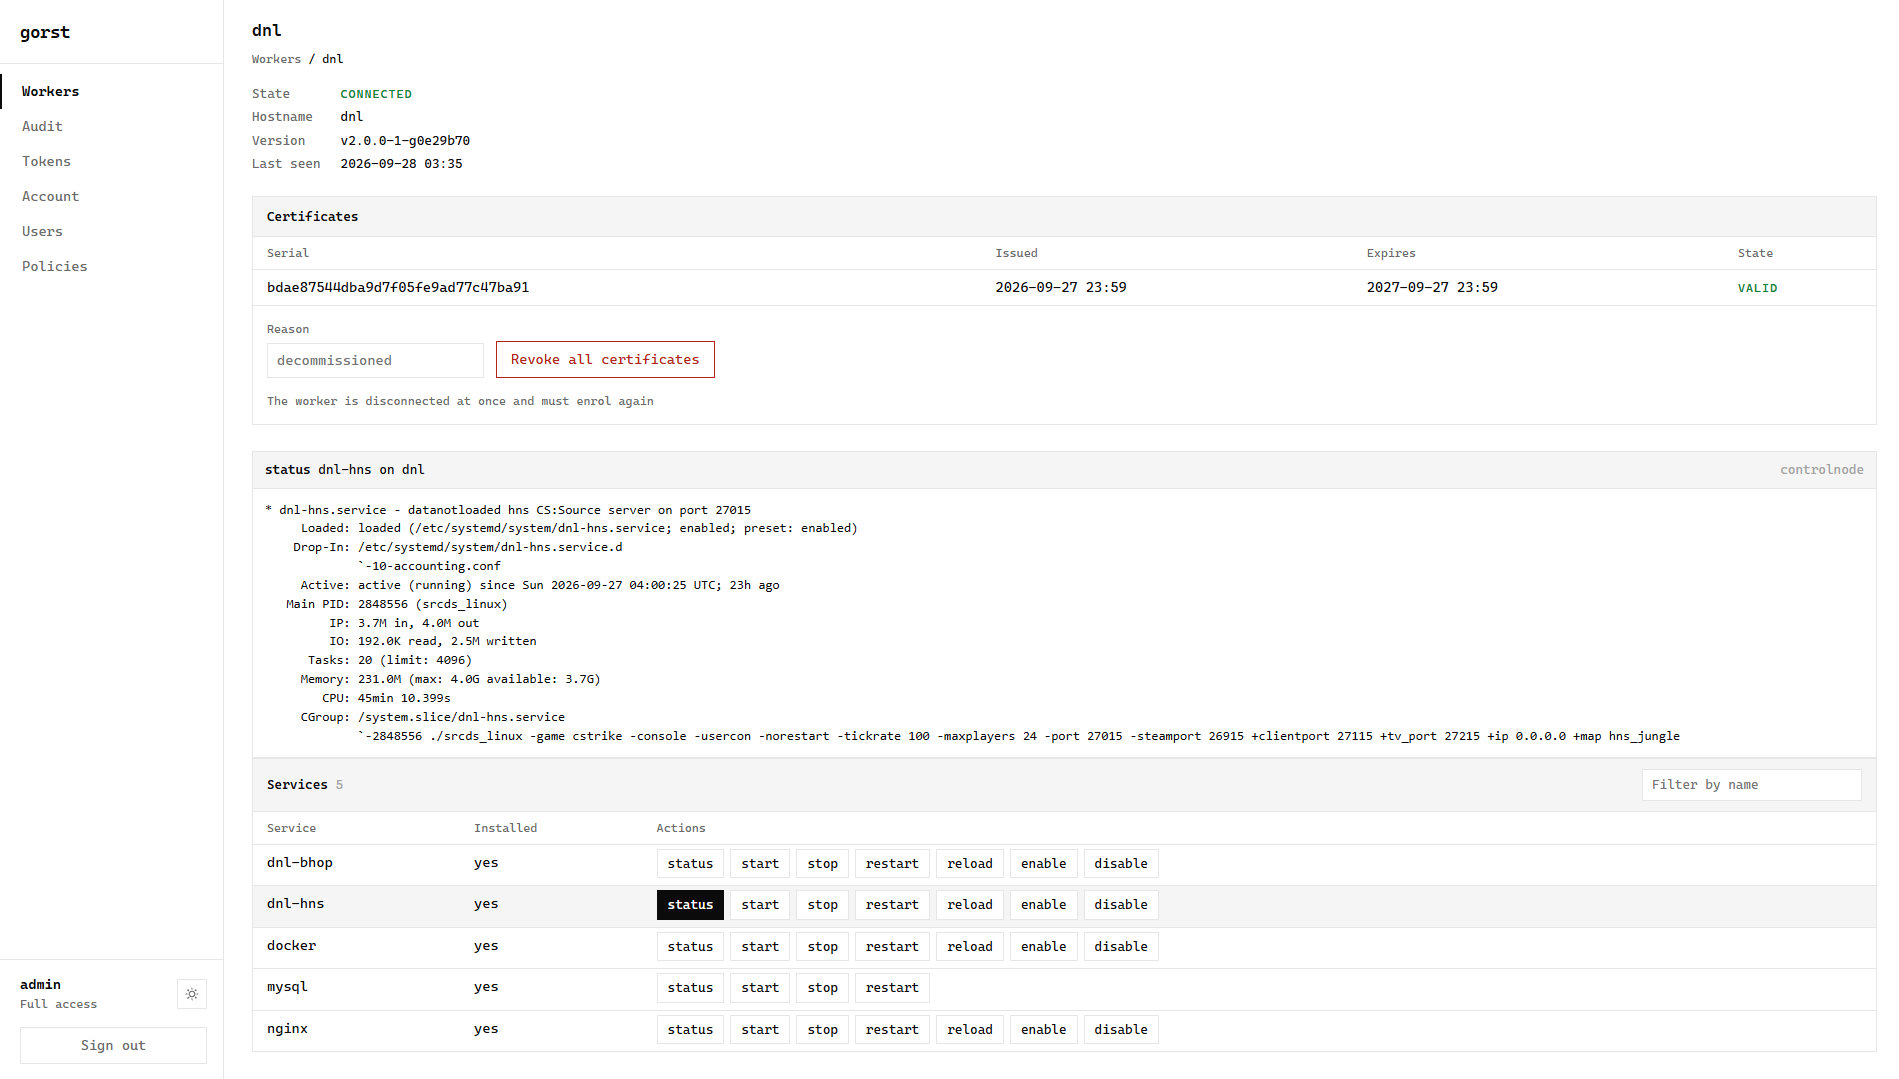
The control node decides who can do what, and on which server. Say you have a server running nginx, and someone else should be able to restart it without getting SSH or root. You create a policy that allows the restart action on nginx on that one server and grant it to the user, and that is the only action they get. They can run it from the web panel, which lists for each service only the actions their policies allow, or through the API with a token that you can build into your own tools, such as a Telegram or Discord bot that restarts the service from a chat command.
How it works
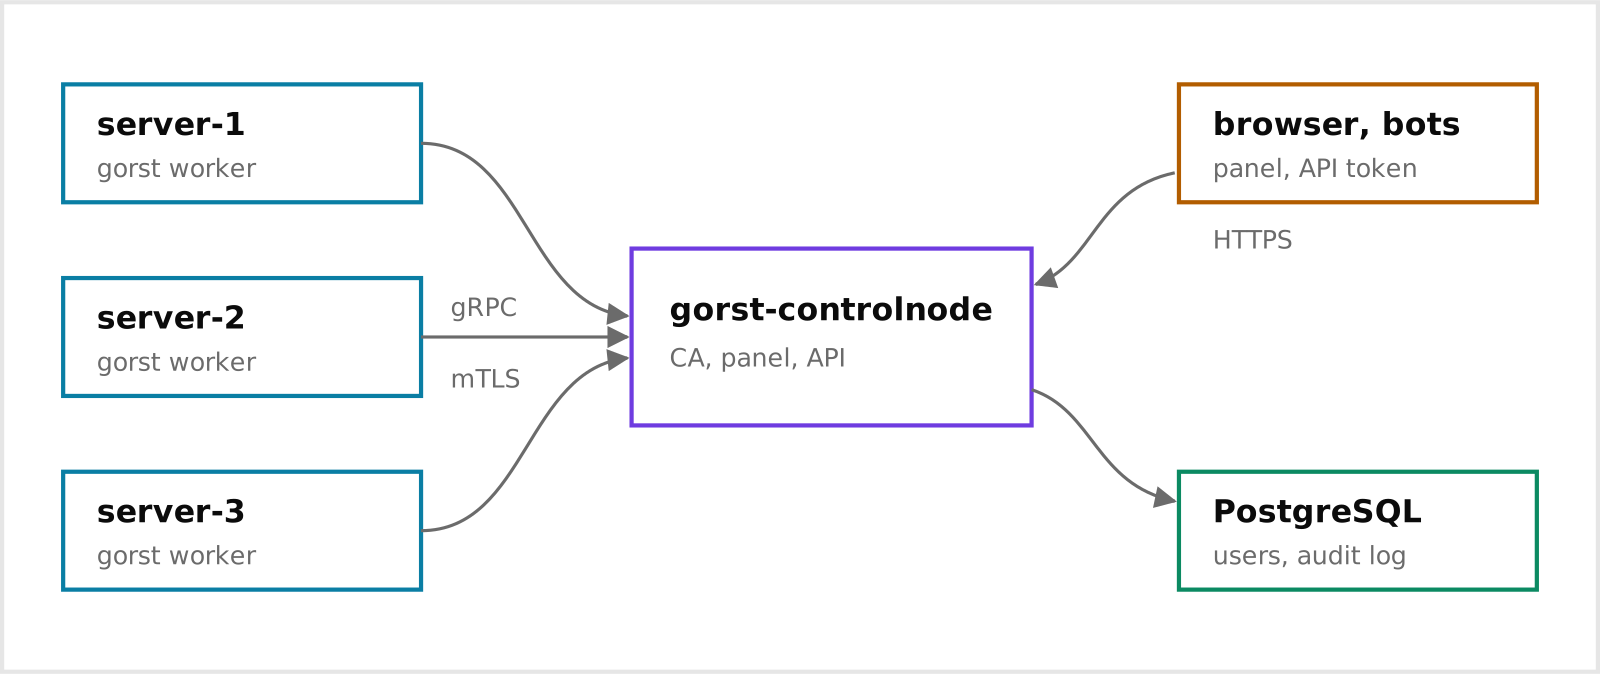
Workers connect to the control node themselves, and the control node never connects to them. When a worker starts, it opens one outgoing gRPC stream and waits for commands on it. That way you don't have to open any ports on your servers, and a machine behind NAT works the same as a VPS with a public IP.
The connection uses mutual TLS. The first time the control node starts, it creates its own certificate authority and later issues a certificate to every worker. Workers renew their certificates on their own. If you retire a server or its key gets stolen, you revoke its certificate, and that machine can't connect anymore.
Installation
1. Build
Clone the repository on the server and build the binary that server needs. The control node and the worker are two separate binaries, and building them takes Go 1.27.1 or newer.
git clone https://github.com/happydez/gorst.git
cd gorst

# on the server that runs the control node
CGO_ENABLED=0 go build -o bin/gorst-controlnode ./cmd/gorst-controlnode

# on every server that runs a worker
CGO_ENABLED=0 go build -o bin/gorst ./cmd/gorst
The install scripts in deploy/ pick the binary up from bin/ on their own, so nothing has to be copied anywhere by hand.
2. Control node
Before installing, make your own config next to the scripts. The installer uses deploy/controlnode.yaml when it exists and falls back to the example otherwise.
cp deploy/controlnode.example.yaml deploy/controlnode.yaml
agent:
  addr: "0.0.0.0:4040"       # where workers connect
  hosts:                     # names and addresses workers will dial
    - cn.example.com

admin:
  addr: "127.0.0.1:4050"     # the web panel and the API

database:
  dsn: "postgres://gorst:...@127.0.0.1:5432/gorst?sslmode=disable"
The names in agent.hosts go into the control node's certificate, and a worker that dials any other name refuses to trust it. The panel is best kept on 127.0.0.1 behind a reverse proxy with HTTPS, or given its own certificate in admin.tls. Without database.dsn the control node still runs, but it forgets users and the audit log on every restart.
Then install it and create the first administrator.
sudo bash deploy/install-controlnode.sh
sudo gorst-controlnode user add --admin --password '...' admin
The installer creates the gorst-cn system user, puts the config at /etc/gorst-controlnode/config.yaml, keeps the certificate authority in /var/lib/gorst-controlnode and starts the service. Its logs are in journalctl -u gorst-controlnode -f.
3. A worker on every server
A worker is set up the same way. Its config lists the units gorst may manage at all, and the installer builds the sudo whitelist from that list and checks it with visudo.
cp deploy/config.example.yaml deploy/config.yaml
services:
  nginx:
    actions: [status, reload, restart]
sudo bash deploy/install.sh
The config ends up at /etc/gorst/config.yaml, and the service runs as the unprivileged gorst user. If you change the services block later, run the installer again. It keeps your config and rebuilds the sudo whitelist from it.
4. Joining the control node
join-token talks to the API of the running control node, and with a database behind it that API answers only to an administrator's token. So first mint a token for the admin account. It is printed once, so keep it somewhere safe.
sudo gorst-controlnode token create --name cli admin
With it, ask for a single-use join token. It is printed together with the hash of the CA certificate.
gorst-controlnode join-token --admin <admin.addr> --token <admin token>
--admin is the panel address from admin.addr in the control node config. Add --tls when the panel serves HTTPS.
On the worker, trade it for a certificate.
sudo gorst join --controlnode cn.example.com:4040 --token ... --ca-hash sha256:...
gorst join generates a key, receives a signed certificate and prints a controlnode block. Commands from the control node run under a local policy that block names, so first add that policy to the existing policies list in /etc/gorst/config.yaml. It has no token because the control node's certificate is the credential.
policies:
  - name: controlnode
    services:
      nginx: ["*"]
Then paste the printed block at the end of the file and restart the worker.
controlnode:
  addr: "cn.example.com:4040"
  ca_cert: /etc/gorst/ca.pem
  cert: /etc/gorst/worker.pem
  key: /etc/gorst/worker-key.pem
  policy: controlnode
sudo systemctl restart gorst
After the restart the server shows up on the Workers page of the panel, under its hostname. The same list is available from the command line.
gorst-controlnode workers --admin <admin.addr> --token <admin token>
5. Permissions and tokens
A user sees nothing until a policy grants it. A grant names a server, a service and an action, and any of them can be *. Here the user happydez gets the right to restart nginx on server-1 and nothing more.
sudo gorst-controlnode policy add --description 'restart nginx' nginx-restart
sudo gorst-controlnode policy allow nginx-restart server-1 nginx restart

sudo gorst-controlnode user add --password '...' happydez
sudo gorst-controlnode user grant happydez nginx-restart
A bot is just a user without a password that has a token.
sudo gorst-controlnode user add deploy-bot
sudo gorst-controlnode user grant deploy-bot nginx-restart
sudo gorst-controlnode token create --name telegram deploy-bot   # the token is shown once
The token acts as its owner and is bound by the same policies, so the bot can restart nginx on server-1 and nothing else. From the bot's side that is a single HTTP request.
func restartNginx(ctx context.Context) error {
	url := "https://cn.example.com/api/v1/workers/server-1/nginx/restart"
	req, err := http.NewRequestWithContext(ctx, http.MethodPost, url, nil)
	if err != nil {
		return err
	}
	req.Header.Set("Authorization", "Bearer "+os.Getenv("GORST_TOKEN"))

	resp, err := http.DefaultClient.Do(req)
	if err != nil {
		return err
	}
	defer resp.Body.Close()

	if resp.StatusCode != http.StatusOK {
		return fmt.Errorf("gorst: %s", resp.Status)
	}

	return nil
}
The full documentation, the REST and gRPC reference and every config option are in the repository: github.com/happydez/gorst.